Understanding the Costs and Safety Steps for a Leak in Pool Filter
A leak in pool filter can quickly turn into hundreds of gallons of lost water each week. This raises utility bills and stresses the entire circulation system. Left alone, the issue often leads to low water levels. Those levels expose the pump to air. Air shortens motor life and invites further damage across the filter tank, valves, and piping.
Homeowners in most regions face similar patterns. They face them whether they run sand, cartridge, or DE units. The basic pressure and seal mechanics stay the same. Before any testing begins, shut off power at the breaker. Close the main drain and return valves. Relieve residual pressure through the air relief valve on top of the tank.
Wear eye protection and keep a bucket and towels ready. Even a small stream under pressure can spray several feet. These simple steps prevent electrical hazards. They keep the work area dry so you can spot the exact source without confusion.
For example, one Florida homeowner ignored a slow drip for three weeks. That led to replacing a burned-out pump motor after the water level dropped below the skimmer. The repair bill exceeded $800. It cost far more than the cost of early diagnosis. In colder climates, the same leak can allow air to enter lines. The lines then freeze and crack during winter shutdowns. This turns a simple seal issue into a full plumbing replacement.
Always keep a garden hose nearby. You can top off the pool immediately after shutting down the system. This prevents the pump from running dry even for a few minutes.
The ideal first step when facing a leak in pool filter is to note the current pressure reading and water level. Then isolate the filter from the rest of the system. Diagnosis stays focused and safe. Mark the water line on the skimmer with a piece of tape. You can measure daily loss accurately. A drop of more than a quarter inch per day usually confirms an active leak rather than simple evaporation. Photograph the pressure gauge and any visible moisture before you begin work. You have a baseline record for insurance or warranty claims if the problem turns out to be covered.
Systematic Checks for Any Pool Filter Leak
1. Reading the Pressure Gauge
Start every diagnosis by writing down the clean-filter pressure and the current reading. Most residential systems run between 10 and 20 psi when the filter is clean. A jump of 8 to 10 psi above that baseline usually signals a clogged element rather than a leak.
If the gauge sits at zero while the pump runs, air is entering somewhere upstream. That air often exits as a leak in pool filter later in the cycle. Check the gauge for condensation inside the lens. A cracked face can give false readings that send you chasing the wrong problem.
Compare the number you see today with the number written on the filter tank label or in the owner manual for your specific model. A steady climb over several days points to debris buildup. A sudden drop often means a cracked laterals or a loose drain plug. Record both numbers before you move to the next check. You can measure improvement after each repair.
Many technicians recommend keeping a small notebook or phone note with weekly readings. Patterns that emerge over months often reveal seasonal issues. These include pollen loads in spring or algae blooms in summer. They drive pressure higher before a leak appears.
2. Inspecting the Filter Lid
Remove the lid clamp or locking ring and look closely at the large O-ring or gasket that seals the tank. Sand and DE filters use a thick rubber ring. It hardens after two or three seasons. Cartridge filters rely on a thinner gasket. It can fold during reinstallation. Run your finger around the entire seating surface. Feel for flat spots or embedded grains of sand that prevent a tight seal.
A common leak in pool filter shows up right at the lid. The ring was not seated evenly. Or the clamp was not tightened in a crisscross pattern. Rinse the ring and the tank lip with fresh water. Then apply a light film of silicone lubricant made for pool equipment. Reinstall the lid and run the pump for five minutes. Watch the seam for drips.
If water still appears, replace the ring rather than trying to stretch an old one back into shape. A practical tip is to order a spare O-ring when you buy the filter. Keeping one in a sealed bag near the equipment pad saves a trip to the store during an emergency weekend leak.
3. Checking Valve Position
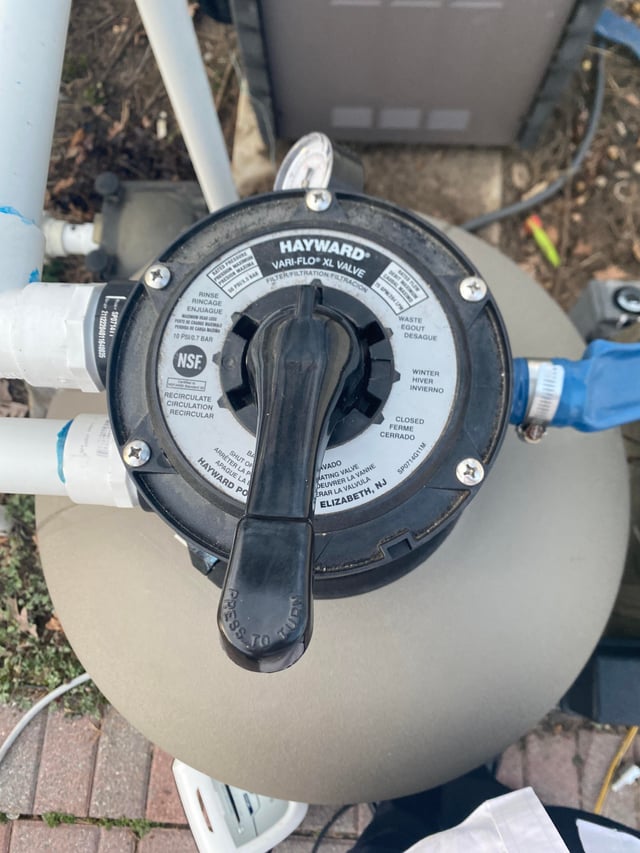
Multiport valves on top of sand and DE filters develop leaks. The rotor seal or spider gasket wears there. Turn the valve handle to each position. Listen for hissing or watch for water seeping around the waste or backwash ports. A leak in pool filter at the valve body often traces to a cracked rotor. Or it traces to a gasket that no longer compresses fully.
Remove the valve cover screws and inspect the rubber pieces. Look for tears or mineral deposits that keep the seal from seating. Many owners find that simply rotating the handle several times while the pump is off redistributes the gasket. It stops minor seepage for a season. If the leak returns within days, plan to rebuild the valve with a factory gasket kit. Do not continue tightening external bolts that can warp the plastic housing.
One pool service story involves a homeowner who kept cranking the bolts tighter each week. The valve body split. Replacing the entire multiport cost three times as much as the $25 gasket kit would have.
4. Examining the Bottom Drain
The drain plug or winterization plug at the very bottom of the tank is another frequent source of water loss. These plugs sit below the laterals or cartridge stack. Even a small drip can empty several inches of water overnight. Wrap the threads with two layers of Teflon tape. Reinstall the plug hand-tight plus one quarter turn with a wrench.
Over-tightening cracks the plastic boss on the tank. This creates a new leak in pool filter that requires a full tank replacement. If the plug itself looks deformed or the O-ring is missing, replace both parts at the same time. After tightening, run the system for ten minutes. Check the area again with a dry paper towel to confirm the drip has stopped.
In older pools, these plugs sometimes seize from calcium buildup. Applying a small amount of penetrating oil the day before you plan to remove them prevents stripped threads and broken bosses.
5. Detecting Sand Loss
When a sand filter loses media, the laterals or underdrain assembly has usually cracked. You will notice sand appearing in the pool or in the pump basket. The pressure gauge will read lower than normal. Water bypasses the remaining sand bed. A pool filter leaking sand almost always requires opening the tank. Remove the laterals one at a time to locate the break.
Replacement laterals for common Hayward and Pentair models cost less than a full tank. They restore proper filtration without replacing the entire filter. After new laterals are installed, add the exact amount of sand listed on the tank label. This is typically 100 to 200 pounds depending on diameter. Then backwash until the sight glass runs clear.
A real-world tip is to place a fine mesh screen over the return line during the first backwash after lateral replacement. This catches any stray sand grains before they reach the pool. It saves hours of vacuuming later.
6. Following the Connection Tightening Sequence
Unions and threaded fittings around the filter often loosen from vibration or from seasonal temperature changes. Start at the pump discharge and work toward the returns. Tighten each union nut by hand first. Then give it another half turn with channel-lock pliers. Never use pipe dope on unions. It can swell the O-rings and cause new leaks.
If a threaded joint still seeps after proper tightening, remove the fitting. Clean both threads. Apply fresh Teflon tape in the correct direction. A systematic pass around every connection catches the small drips. They add up to a noticeable leak in pool filter over a week. After all unions are secure, open the valves. Restore power. Recheck the pressure gauge to confirm the system returns to its normal operating range.
Homeowners with variable-speed pumps should run the system at high speed during this final check. Any hidden leaks become visible before returning to normal filtration speed.
Practical Field Notes on Tracing Leaks
Using Dye Tablets for Slow Leaks
Dye tablets sold for leak detection in pools work equally well on filter tanks. Place one tablet near a suspected joint while the pump runs at low speed. Watch whether the colored water is pulled into the system or pushed out as a drip. This method reveals a leak in pool filter from hairline cracks in the tank. They stay invisible under normal light. Keep the pump off for the first minute. The dye can settle. Then restart and observe for thirty seconds. The test uses very little dye and avoids the mess of food coloring. Many technicians carry a small LED flashlight to shine through the sight glass. The contrast makes even faint dye movement obvious within seconds.
Replacing Multiple Gaskets at Once
When one gasket fails, the others in the same filter are usually the same age and condition. Replacing the lid ring, valve spider gasket, and drain plug O-ring during the same service call prevents repeat visits from the same leak in pool filter. Kits that contain all three pieces cost only a few dollars more than buying them separately. They save time on future disassembly. Keeping a spare kit on the equipment shelf means you can finish the job in one visit. You avoid waiting for parts to arrive mid-repair.
Checking the Sight Glass and Backwash Line
After the main checks, examine the sight glass on the multiport valve and the backwash hose or line for any moisture. It appears only during certain valve positions. A faint film inside the sight glass that grows during filtration often points to a failing spider gasket. It does not point to an external union. Running the valve through a full backwash cycle while watching the waste line can expose internal bypass. It would otherwise remain hidden until sand loss becomes severe.
Recapping the Diagnostic Process and Next Steps
Follow the order of pressure reading, lid check, valve inspection, bottom drain, sand loss, and connection tightening. You will locate the source of most leaks without unnecessary parts replacement. After each fix, log the new pressure reading and the amount of water added to the pool. You can verify the leak in pool filter has been resolved. If the pressure stays stable for seven days and no water loss appears on the sight glass or pool level, the repair is complete. Persistent issues after these steps usually point to a cracked tank or internal lateral failure. That requires professional service or filter replacement. Keep the log notes with the filter manual for the next season. Future checks start from a known baseline. Scheduling a quick visual inspection every spring and fall catches small problems before they become expensive emergencies. It keeps your pool water clear and your equipment running efficiently year after year.
Further Reading
- Repair a Pinhole Leak in a Pool Filter Housing
- Persistent Issues Across DE, Sand, and Cartridge Pool Filters
- Sand Filters Compared with DE Filters on Leak and Flow Problems
- Why Diatomaceous Earth Filters Develop Cracks in the Manifold
- Saltwater Versus Sand Pump Performance Under Low Pressure Conditions